- Introduction to KNN algorithm
- What is the KNN algorithm and how is it implemented?
- Working of KNN for classification problems
- KNN implementation in python
- Evaluation of KNN model for classification
- KNN for regression problems
- Evaluation of KNN model for regression
- Advantages and disadvantages of KNN algorithm
- Summary
Introduction to KNN algorithm #
KNN stands for k nearest neighbors. It is a non-parametric lazy-learning supervised machine learning algorithm. Supervised machine learning algorithms are such algorithms that have input and output data for the training of the model. We also call the output data labeled data because it gives the model the output as well. We call KNN a non-parametic algorithm because while implementing it we do not make any assumption on the distribution of the dataset on which it is trained. It is also known as a lazy-learning machine learning algorithm because it does not learn from the dataset immediately, rather it stores the whole dataset and each time we make a prediction, it does action on the whole dataset. In other words, it runs the same operation of prediction each time we want to make predictions.
What is the KNN algorithm and how is it implemented? #
KNN algorithm is based on feature-similarity. We find its feature similarity (distance) and pick k number of them. Based on the k nearest ones we make our prediction. For classification problems, the prediction is the mode of k elements and for regression it is the mean of the k elements. What value to assign for k differs on different datasets which we will talk on picking later in implementation in python section.
Working of KNN for classification problems #
As we mentioned above, to solve classification problems using KNN we find the feature similarity (distance) of the new data point, and the prediction will be the mode of the k nearest elements.
The dataset below is used just for demonstration and may not be accurate
| pressure | humidity | rain | |
| 0 | 14.12 | 0.89 | yes |
| 1 | 14.27 | 0.86 | no |
| 2 | 3.93 | 0.89 | yes |
| 3 | 14.01 | 0.83 | yes |
| 4 | 11.04 | 0.83 | no |
| 5 | 13.96 | 0.85 | no |
| 6 | 12.36 | 0.95 | no |
| 7 | 14.15 | 0.89 | yes |
| 8 | 15.60 | 0.70 | ? |
The above dataset shows the relationship between raining, humidity, and pressure. We are expected to predict whether it will rain or not for the point with index eight. First, we find the distance between it and the other element using Euclidean distance</p>
For example, for two datapoints that have three features, we calculate the distance between them using the following formula

Now let’s find the distance between point eighth and other points.
| pressure | humidity | rain | distance | |
| 0 | 14.12 | 0.89 | yes | 1.492146 |
| 1 | 14.27 | 0.86 | no | 1.339589 |
| 2 | 3.93 | 0.89 | yes | 1.671547 |
| 3 | 14.01 | 0.83 | yes | 1.595306 |
| 4 | 11.04 | 0.83 | no | 4.561853 |
| 5 | 13.96 | 0.85 | no | 1.646845 |
| 6 | 12.36 | 0.95 | no | 3.249631 |
| 7 | 14.15 | 0.89 | yes | 1.462395 |
After applying, Euclidean distance we get to the above table. Now we pick the k nearest of the elements. Given our k is three we pick the closest, and as we can see the three nearest elements are 1,7 and 0. For two of them the prediction i yes and for one it is no. Thus, our prediction for element 8 is yes.
index | pressure | humidity | rain | distance |
| 1 | 14.27 | 0.86 | no | 1.339589 |
| 7 | 14.15 | 0.89 | yes | 1.462395 |
| 0 | 14.12 | 0.89 | yes | 1.492146 |
| 3 | 14.01 | 0.83 | yes | 1.595306 |
| 5 | 13.96 | 0.85 | no | 1.646845 |
| 6 | 12.36 | 0.95 | no | 3.249631 |
| 4 | 11.04 | 0.83 | no | 4.561853 |
| 2 | 3.93 | 0.89 | yes | 11.671547 |
KNN implementation in python #
In this section we are going to go through using python library sklearn to create classification models. Sklearn provides tools for data splitting, model training and model evaluation.
Now we are going to use Social Network Ads dataset. This dataset contains data on the gender, id, estimated salary of a user and whether the user purchased a particular item or not. Dataset contains 400 rows.
Our first step is to import our data from the csv file as a pandas dataframe. For this we use a python library called Pandas.
import pandas as pd data = pd.read_csv(“Social_Network_Ads.csv”) data.head()
| Gender | Age | EstimatedSalary | Purchased | ||
| 0 | 0 | 19 | 19000 | 0 | |
| 1 | 0 | 35 | 20000 | 0 | |
| 2 | 1 | 26 | 43000 | 0 | |
| 3 | 1 | 27 | 57000 | 0 | |
| 4 | 0 | 19 | 76000 | 0 |
Once, we have our dataset ready we split it into training and testing part with proportion of 80% to 20%. We use the training dataset for training our model and testing for evaluating our model.
from sklearn.model_selection import train_test_split
## First we divide our date set to training dataset and testing_dataset then we divide them into x and y
## as input and output data
training_data, testing_data = train_test_split(data, test_size=0.2, random_state=25)

X_training = training_data.iloc[:,0:3]
y_training = training_data.iloc[:,3]
X_testing = testing_data.iloc[:,0:3]
y_testing = testing_data.iloc[:,3]
Having our data ready, first we initiate our model. The default value of n_neighbors is 5. But we assign it to 3. Then, we train our model on the training dataset. The model will not learn from the dataset immediately, it stores the whole dataset, for further predictions.
from sklearn.neighbors import KNeighborsClassifier
model = KNeighborsClassifier(n_neighbors=3)
model.fit(X_training,y_training)
Evaluation of KNN model for classification #
For evaluating classification problems, first we create a confusion matrix. In confusion matrix, we compare our predicted results with the real result. The ones which are positive and were predicted to be positive are called true-positives (TP). The ones which are negative and were predicted to be negative are true-negatives (TN). The ones which are positive but were predicted to be negative are false-negatives(FN). And the ones which are negative but were predicted to be positive are called false-positives (FP).
| True | False | |
| True | TP | FN |
| False | FP | TN |

The accuracy of the model shows overall how accurate the model is. It takes values from 0 (least accurate) and 1 (most accurate).
y_predict = model.predict(X_testing)
from sklearn.metrics import accuracy_score
accuracy_score(y_testing,y_predict)
For example, for k = 3 the accuracy of our model is 0.8. We can change the k value to see which k, it is the most accurate.
list_accuracies = []
for k in range(1,15):
    model = KNeighborsClassifier(n_neighbors=k)
    model.fit(X_training,y_training)
    y_predict = model.predict(X_testing)
    accuracy = accuracy_score(y_testing,y_predict)
    list_accuracies.append(accuracy)
For getting a better perspective on the relation between k value and the accuracy of our model let’s visualize our result.
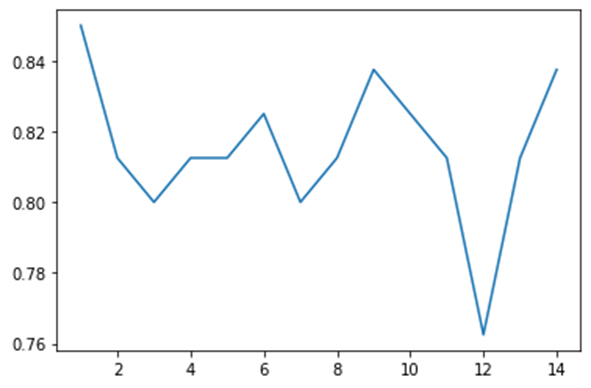
From the graph we can see that for 9 and 14, the accuracy of our model is the highest. For optimization purposes, we pick 7 as fewer operations will be executed. Now, finally we can say that our knn model with k equal to seven gives us the optimum solution for classification our problem.
KNN for regression problems #
Regression problems are such problems that their output data is continuous. To implement knn algorithm for regression problems, like classification problems, we first find the distance with other data point and find the mean of the k nearest neighbors.
Now let’s create a model for predicting housing prices. First, we display the head of our dataset tomake sure that it is in a good format.
import pandas as pd
data = pd.read_csv("estate_data.csv")
data.head()
Output:
| number_of_rooms | floor | area | latitude | longitude | price | |
| 0 | 1 | 1 | 58.0 | 38.585834 | 68.793715 | 330000 |
| 1 | 1 | 14 | 68.0 | 38.522254 | 68.749918 | 340000 |
| 2 | 3 | 14 | 84.0 | 38.520835 | 68.747908 | 700000 |
| 3 | 3 | 3 | 83.0 | 38.564374 | 68.739419 | 415000 |
| 4 | 3 | 4 | 53.0 | 38.530686 | 68.745261 | 513000 |
Now, let’s split our data into training and testing subsets and train our algorithm on the training data.
from sklearn.model_selection import train_test_split

## First we divide our date set to training dataset and testing_dataset then we divide them into x and y
## as input and output data
training_data, testing_data = train_test_split(data, test_size=0.2, random_state=25)

X_training = training_data.iloc[:,0:3]
y_training = training_data.iloc[:,3]
X_testing = testing_data.iloc[:,0:3]
y_testing = testing_data.iloc[:,3]

from sklearn.neighbors import KNeighborsRegressor
from sklearn.metrics import mean_squared_error

model = KNeighborsRegressor(n_neighbors=3)
model.fit(X_training,y_training)
predict = model.predict(X_testing)
rmse = (mean_squared_error(y_testing,predict))**(1/2)
 print(f"Rooot mean squre error of our algorithm is {rmse}")
Rooot mean squre error of our algorithm is 0.028
Evaluation of KNN model for regression #
For evaluating our model, we have used root mean squared error.

It shows how far the prediction from the real data is.
Now to tune the n_neighbours, we can reduce the error of our model. We can train our data for different k values and visualize it.
rmses = []
for i in range(1,41):
    model = KNeighborsRegressor(n_neighbors=i)
    model.fit(X_training,y_training)
    predict = model.predict(X_testing)
    rmse = (mean_squared_error(y_testing,predict))**(1/2)
    rmses.append(rmse)

import matplotlib.pyplot as plt
import numpy as np
xpoints = list(range(1,41))
plt.plot(xpoints, rmses)
plt.show()
Output:
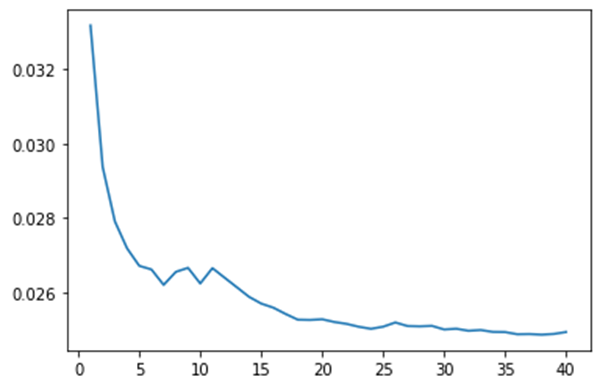
As we can see, the graph is an elbow graph. This means that after a certain value the graph will become flat. For example, in our case after k = 24 the error does not change much. Thus, we can pick k = 24 for our model to give the least rmse.
Advantages and disadvantages of KNN algorithm #
The advantage of the KNN algorithm is that it can be trained on a dataset of any shape. For example, for some algorithms we assume our data to be in a particular shape. But similar to other algorithms if our data is not balanced, our data will become more biased. For example, if our target variable is categorical and not balanced, our model will be more accurate toward the category with more instances. And In case of regression problems, the model is more accurate for the range with larger data.
Also, the KNN algorithm is intuitive and easy to implement. The concepts behind it are easy mathematical ideas and their implementation is very easy. The disadvantage of the algorithm is that it is costly in terms of time and space. Being a lazy learner, it stores the whole dataset which takes a lot of memory and operations are run each time we want to make a prediction. Running each time and performing the same operation takes a lot of time.
Summary #
To sum up kNN algorithm is one of the most efficient algorithms (in terms of accuracy) which is easy to understand and implement. But its time complexity is high, and it takes more resources for execution. Also, picking the best k value is very important for optimizing the accuracy of the algorithm.
A complete copy of the source code can be found on GitHub KNN Algorithm


